This blog uses cookies. By continuing to browse this blog you are agreeing to the use of cookies. OKLearn more. Other websites' cookies can also be placed on your device when you click on links, or share content on social media.
Welcome to my blog! I love beading and this blog is an attempt to share a few of my beady tries and things, thoughts and thrills and inform you about what's new (patterns, jewelry, etc..) I got hooked by the wonderful art of beading in 2004 and never stopped since then. I live in Switzerland, in a small town between Geneva and Lausanne.
I did a swap with a wonderful bead designer whom I really love. I do not just love what she makes, I love her as a person. We decided to make earrings for each other, and because we had a lot of things to do, both, we didn't decide on a deadline. When I started my second earring, my friend hadn't found time for the swap on her side, but that didn't bother me. However, plenty of little issues prevented me from finishing the second earring: thread broke, a bead broke, etc. I put it aside and in less then a week from that moment, my friend finished her piece for me - something completely different than the earrings we had agreed upon. Something beaded especially for me. I felt honored and happy, because now that second earring didn't matter so much anymore and I could make something different for her too.
I had a beautiful crystal bead in my stash that made me think of a gown dancing in the wind, so I had the idea of making a pretty dress for a pretty lady! When inspiration hits and the heart is filled with love while making something for someone special, I feel like I'm in creative La La Land and love it, for it feels so good.
Using my "petal to pod" method, I first created the dolls little head - I seem to always start with a doll's head.
She smiled at me all along the beading journey :)
Then I made her arms - also petals, but folded.
The top of her dress is made with 2 petals and a miniature zigzag- (in the round) and then I added little by little her shoulder blades with strap for the dress. Last but not least her dancing shoes, a flower in her hair, and a little necklace. I think that she really seems to be dancing. So this is why I called her "The Dancer".
The two pretties together. They are both made
with size 15/0 Japanese seed beads.
The Dancer's collar is made
I received my friend's package before mine arrived at her place, but I kept it closed, to wait to open our swaps together, thanks to the magic of the Internet. It felt wonderful. My friend loves her little lady, and I love what she made for me. And it was really good to be in La La Land.
Sometimes you have such a wonderful time, such a perfect day with friends or family, that you say'd "I wish that I could bottle this day and be able to open it later, when I need to feel those good vibes again". The good news is that this is possible (and there is no bad news).
"Amphorette"
As many of you have probably heard, most gemstones have special metaphysical properties which vary from one to another. Amethyst has, for example, a calming reputation, whereas bixbite is a stone that will increase your energy levels which is very helpful to kick ass when needed. It is better to put a large specimen of the first stone on your bedside rather than the latter. This website gives interesting information about many gems.
You should always cleanse your
gemstones and crystals, also new
ones, before using them.
You can also charge quartz crystal with good vibes. Yes you read that well: quartz crystal can be “charged” with moods, feelings, intentions, messages. Love. Laughter. As my hubby says, "it is magic until science explains it". I like both science and magic.
Many moons ago, at the occasion of a global "give crystals back to Mother Nature" action organized by a Facebook group, I gave back many quartz crystal chips. I cleansed them in full moon light near a children’s playground, where they got charged with their playful good vibes the next day. Even though it sounds odd, quartz crystals are like sponges, they absorb what surrounds them. When I removed my crystals from the tree where I hang them, I could "hear" children laughing. It felt really good.
Bridge over the Serine, from where I
threw my crystals in the river.
Then I went to a small river near my town - the "Serine" to throw all the crystals in the water. I sang a song that I had composed for the occasion. The crystals in the water would transmit the good vibrations to the river. Streaming with the water, the good vibes would travel to the Lac Léman (Lake Geneva), and then further down enter the Rhône, cross la France, then enter the Mediterranean sea... Eventually the water would evaporate to become rain and maybe drop on someone's head in Budapest, or China... In the end, the good vibes would go round the world and touch every single person. It may sound completely surreal, but think about homeopathy: the active substance is diluted to a degree equaling less than 1 drop in the entire Atlantic ocean. In other words: inexistant. But nonetheless, homeopathy heals.
I did this many years ago, but the tiny powerful crystals still are charged with children's laughter and good vibes. I kept a few chips to add onto a mini hair-comb which always feels very special when I wear it, and kept the 4 chips that felt best for a special project. They still feel amazing, I still "hear" the children's laughter.
no matter how small, or insignificant
they look, if they feel good,
quartz crystals are good.
You can charge your crystals in a very simple manner, but you can also hang them, cleansed, in an organza bag in the room where you expect to have a wonderful moment with a beloved one, a family reunion, Thanksgiving, a birthday, a wedding, etc. Immortalize that perfect moment, and enjoy it as often as you wish. Experience the magic, or offer some magic as a gift to a dear one. If things don't work out well, cleanse them, and start over.
It may not be noticeable, but inside the Paradox Pendulum, there is a hollow that can contain a small item like the little "Amphorette". I embellished it with beads left over from the Perlen Poesie project. I love how this secret compartment can welcome a keep-sake. You nearly can't see it. In the photos above, the Amphorette is added to the pendant in the right picture, not in the left.
The other good news is that I just discovered that I can list free tuts in my IndieMade store, so I listed the free tutorial for this Amphorette for you to download (note: you need to give an e-mail to receive a link for the download). And while you are there, have a look at my other tutorials - I just listed the instructions to make the beautiful Faraday bracelet in my IndieMade shop, and also in my Etsy shop.
Eiffel Tower seen from the Alexander III Bridge in Paris
Photo courtesy AG Photography
Do you remember my blog post in September where I told you that I would be the "cover girl" of the beautiful magazine Perlen Poesie in December? Well, it's been a long wait, but I can finally show you what I cooked up for this 35th issue, and I hope that you will find it worth the wait: here is "New Year's Eve", composed of a Roller Chain Rope lariat and a Paradox Pendulum pendant:
"New Year's Eve" - Paradox Pendulum on Roller Chain Rope
You may notice that this project is a simplified version of my Toho Challenge Roller Chain Rope and Paradox Pendulum, but I omitted the embellished Cellini swirl at the top of the pendant. The Roller Chain Rope lariat is a double sided Diamond Weave Rope and can also be worn in a variety of manners without the pendant - you will find suggestions at the end of this post.
X-mas 'pendulum'
I am really happy with this piece, because to me, it has the perfect feeling of a December night in the city. When making it, I had "December" in mind, but even though the pendulum can be a very nice Christmas decoration, I wasn't motivated to make one early in the Summer, so I went for a "New Year's Eve" theme. I made the Christmas bauble in the photo here on the right later.
Now to explain how to make a Roller Chain Rope and a Paradox Pendulum is one thing - that is the "tool box" part that you will find in the magazine, and in my shop in February. However, to explain what exactly made me choose these colors and forms, beads and charms, is a totally different thing, and that is what this post is about: I make things from my heart and I will try, using images, to explain that aspect, and hopefully it will help you to make your piece a happy one, from your heart. Maybe yours will want to be ocean blue and turquoise green with cauri shells instead of cotton pearls, or emerald forest green and fuchsia with exotic bird charms or flowers...
The main color in my pendant is iris purple. It represents the mysterious variegated dark plum skies we sometimes have above Geneva on Winter nights, resulting from the amber street lights and other sources of light reflected by mist or clouds. David Fraga's beautiful photo of the Arve, a river crossing Geneva (colliding with the Rhone further down), illustrates this perfectly:
Arve, Geneva, photo courtesy David Fraga
Other cities also sometimes have this type of beautiful purple sky for the same reasons, like Paris:
Paris-la-Défense, Paris - photo courtesy Dimitri Destugues
The big white coton pearls remind of snow, but they also represent old round street lamps. I've always loved white globes. When I was a teenager, I often appreciated their soft light down town Geneva in December, for my school was located Rive gauche, and to go to the train station on Rive droite, I had to cross the Rhone river, which I did often by foot. There are several pedestrian bridges which are lit by these globes, as you can see in the photo below.
Quai Besanson-Hugues, by Patrick Nouhailler
I also love the beautiful railings and the Rousseau Island farther in the back, recognizable by its tree silhouettes.
Mr. Serge Vescovi sells chestnuts since more than
50 years - Photo Pierre Abensur, courtesy TdG.
Closing my eyes, I can nearly smell the roasted chestnuts sold at the Pont de l’Île where the above photo has been taken from (the "Island Bridge", which has a very old history). Roasted chestnuts are an institution in Geneva in the Fall and Winter. I might well have bought some from the vendor in the photo left :) Yum!
But let me come back to the lamps: some are well known meeting points for people, before going to a party or event. I love the one in the photo at the top of this post very much - it is the famous "Ronde des Amours" on the Alexander III bridge in Paris. It is an extraordinary work of art, but uses electric light. London still has 1600 Victorian gas lamps, lit and taken care of every day by gas engineers, and I find that simply amazing. I love these beauties!
And maybe you guessed it already, but the orange fire-polished beads in the Roller Chain Rope represent all those lovely lights which look like long necklaces on river banks, bridges, roads and boulevards...
Alexandre III Bridge, Paris, France (25 December 2010) by Dimitri Destugue
Brooklyn Bridge over East River, New York, USA
Geneva, Lake, the Quai Gustave-Ador and the Salève with the Pâquis light tower at the Front
As you can see, this lariat and pendulum are all about light in the dark, meeting points, roads and bridges - all symbols of reunion. And that is what the 31st of December is about. Coming together with friends and having a good time and, for example, sing Auld Lang Syne... And of course rivers and bridges are great places to watch fireworks, for the view is excellent and the water a safer place to lit fireworks. But in Switzerland, fireworks are not shot on New Year's Eve, so there are no 'Fireworks' added to my pendant. I added clock parts and chain, to symbolize time and the count down to midnight, but you can add your own fabulous coral fringes if you wish. The pendulum is a very versatile and playful design and will love to be customized.
Now some hints for the Roller Chain Rope:
The lariat has a gold-filled hook clasp hand made by Almendro on Etsy, whose work I like very much. This type of clasps is very practical for reversible or twisted ropes.
Hook clasp
I like to make a surgeon's loop in the center of the lariat (also called an overhand bow) as you can see in the photos above. If your thread tension on the edges is soft, you can make all sorts of knots, like a tie knot or Chinese knots. There exist so many knots! The more loops you will make, the shorter the rope will become. You can also not knot, but twist the rope.
Have fun playing!
Make the lariat long enough to wrap it 5 times around your wrist, which should make it possible to wrap it easily 2 times around the neck, or 4 times around the ankle. For me, this resulted in a 1-meter lariat. Depending on your morphology, this can vary somewhat.
1
2
You can wear the lariat in a variety of manners. Because it is flat yet dimensional, it is reversible and can be twisted. It is visually more interesting to use two different colors for each side.
3
You can wear the lariat as a long twisted rope (1), as a short double twisted rope (2), or as an infinity loop choker (3).
4
Note that if you twist the rope, it will become shorter.
It is beautiful when completely twisted (4). The hook clasp is hidden inside the beadwork.
Voilà! Now you know nearly everything about this project and the playful possibilities that it offers. Yes you understood that well: nearly. There is one more thing to discover: a litlle secret hidden inside the pendulum.
"New Year's Eve" - Paradox Pendulum on Roller Chain Rope
My next blog post will be about this little secret that is a small Christmas gift for you.
Stay tuned!
I wish you happy beading, counting down to New Year's Eve, one bead at a time ;-)
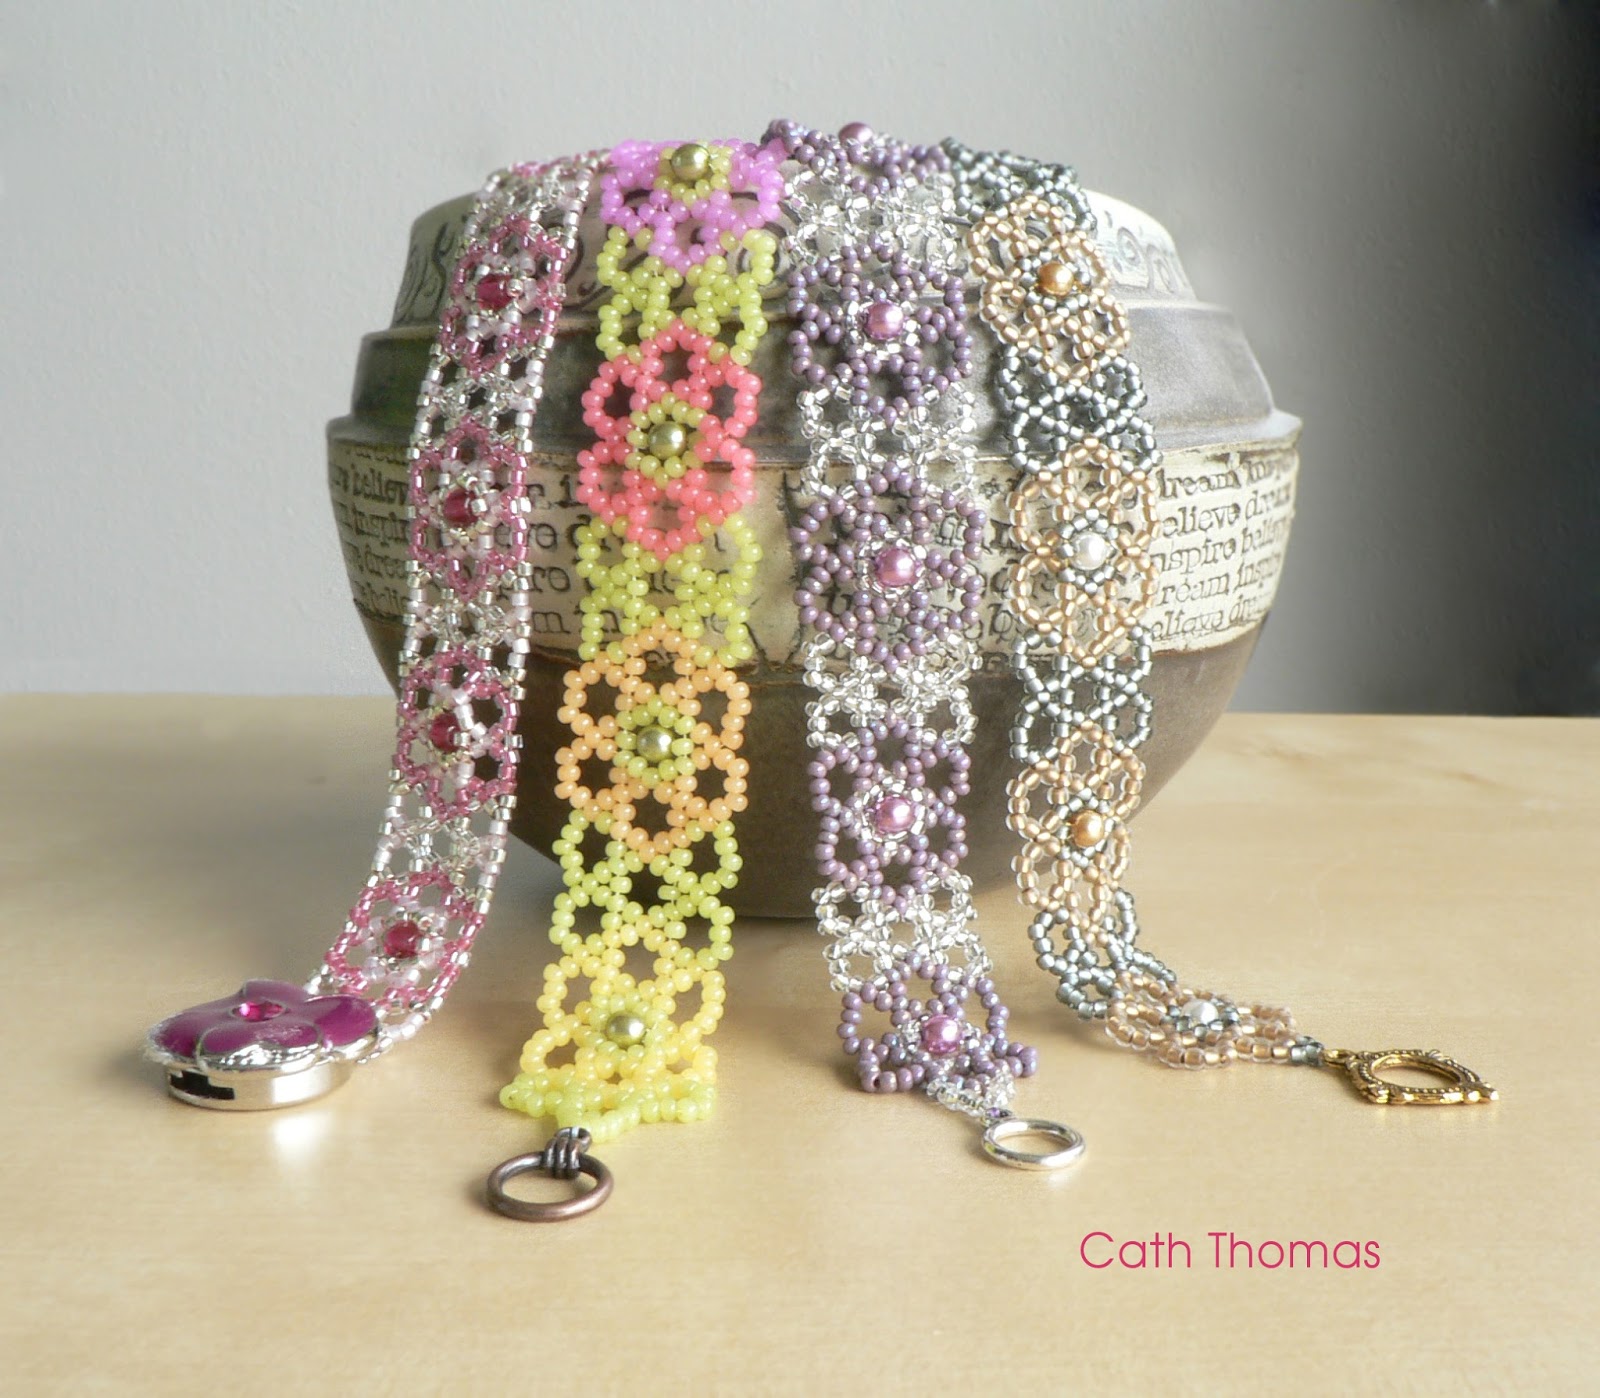
Two new designs have been addedd to the shop. The Pinwheel cuff / bangle and the Florets Bracelet. You will love them for different reasons: the Pinwheel cuff has a fabulous texture, and the Florets bracelet is a dainty little sweetness that builds up so fast that you'll make one for all women and girls in your tribe in very little time.
"Florets"
Pinwheel Cuff - in "Academy" green
I just received the latest Miyuki seed beads called "spacers", said to measure 2.2x1mm and 3x1mm, which is equivalent to a size 11/0 and a size 8/0, but thinner. They are very similar to the Toho "demi-round" seed beads, which measure 2.2x0.9mm and 3x1.15mm.
Miyuki Spacer beads 11/0 and 8/0
I love to use these little seed beads instead of a soldered ring to attach to an earring finding, or to sandwich beads or pearls to fill spaces with just the right amount of material without taking the lead. They add a little bit more texture and I love their look in my Cosmic Spiral lariat where they sandwich the red pearls.
I couldn't find information about the exact size of the spacers on Miyuki's website. Not many vendors mention their height (1mm). In the photo below, you will see that they are bigger than the Toho Demi rounds. If you count the number of beads, you will see that for 1cm you need less Miyuki (iris gold) than Toho. The Toho size is accurate and so is the size of the Miyuki spacer 11/0, 2.2x1mm. However, I think that the Miyuki spacer 8/0 measures 3x1.25mm and not 3x1mm.
From left to right: 9 Toho Demi round size 8/0, 8 Miyuki spacer size 8/0
11 Toho Demi round size 11/0, 10 Miyuki spacer size 11/0
As you can see in the photo above, showing a card with seed beads printed for size reference (a Preciosa Ornela reference card), sizes are measured by their diameter. The Toho and the Miyuki correspond to the size, although the Toho, here again, seem to be a liiiiittle bit smaller. The hole in the Miyuki spacers also seems to be slightly bigger.
Left Toho Demi Round 11/0, right Miyuki Spacer beads 11/0
There is a more distinct difference between the two brands, and that is their shape: whereas the Toho demi-rounds have indeed round walls, the Miyuki spacer wall is nearly flat, and visually, this makes a difference. I'd say that seen from the side, Toho's offer an even shine, and a quite thin, very discreet surface, whereas the Miyuki's show a thicker and flat surface, which shines only when seen from one direction - eg. when the beadwork moves.
Both the demi rounds and the spacers are truly delightful, precise, thin beads.
Left Miyuki Spacer beads 8/0, right Toho Demi round 8/0
Interestingly, the difference between the two brands in these thin beads is the contrary of the difference between their respective ordinary seed beads, where Miyuki seed beads 11/0 are smaller and slightly rounder than Toho seed beads 11/0.
Voilà, that's all.
.
.
.
.
Oh no that's not all. I also wanted to let you know that I have just listed a tutorial for this fantastic little skeleton - Elvis - in my shop. People who order a pattern for the same price as that one can get him for free until the 31st of October 2017. So if you buy a tutorial for the Pinwheel Cuff,you can get Elvis for free. Don't add him to your cart - just drop me a note that you want him too!
Except on paper (sketching), I had never beaded in my bedroom. But last Monday (October 9th 2017). I decided to go there for it is the only quiet place to film a video explaining how to do fast peyote with increases, using two threads. I talked about this method on Facebook, and one of my beady friends said that she was waiting for somebody to show it to her for she didn't get it right. So I thought that it would be nice to show it to all. It is a cool, fast method, and spares the tendons.
You'll see that I am far from being a pro at making videos. There are a couple of big sighs in it, because I have difficulties saying things right - I've always had, also in writing: I often say later what should come first, and vice versa. I also tend to mix up 'stitch-string-add' etc. Because of fibro, I forget to mention things I wanted to mention... and count the beads more times than shown in the video. This results in a lot of editing in both writing and filming. I hope that you will understand it despite the little cuts.
I am happy with the sound from an avian point of view. My first attempt to film this technique was ruined by a lovely, but deafening Figaro. I love my birds and Figaro and Charly are no exception, but they are noisy beasts. Seeing that I can't ask them to shut up, the bedroom appears to be the right place. It is actually really odd to not hear them at all when I am not talking. Next time I think that I'll leave the door open to at least hear them a little bit. I miss them :D
Figaro, Fluff' the Puff', and Miss White, sun bathing.
They are quiet at night, but then I still can't film because I'd need spots and those of you who know me, know that I can't use spots - also not for photography. The natural light in the bed room appears to be good enough - there is a huge window, letting lots of light enter the room without direct sun light.
Now there must be a fire polished bead somewhere in a corner of the room, because I am sure that I heard it fall. It makes a different sound than a seed bead, and seeing that I was adding those lovely faceted bead to the belly of my fish, there were FP on the BOI-board.
So now you may ask what fish?
May I present to you Takato, named after his 22cm real-life model, a big oranda living with us:
Takato and Takato
It is a purse that came together completely naturally. I had a little purse that I kept in my stash to reuse to make this fish. It had a very precise idea in mind since I wrote the book Diamond Weave (DW) but never got to make it. Then one day I saw Julia Turova's beautiful bead-knitted frog and it reminded me of my project.
I didn't want to bead crochet or knit. I wanted to use the beautiful pattern I imagined with the Diamond Weave Chinese Coin Motif stitch (variation 10 with Thread Cover Beads - TCB) for the back of the purse. It was a difficult project, but with plenty of "luck" - many things were made without having to undo or redo them, like the fish butt. I can't believe that I made it right immediately, because I actually was like "OMG how am I going to join it all and give that fish a nice shape? And there, a petal initially made for the gill plates that was too small got transformed into a "butt", which even appeared to be the perfect support for the tail. I call this beading with the Universe. Ask and you are answered. The next petals that I made for the gill plates were again too small, so I kept them for the tail. I really had many "how could I do this, improve that", and each time I asked myself, the answer came like magic. Everything fell in place better than I could have imagined. For those who wonder, petals are a two-increase form that is a very versatile component, The free tutorial can be downloaded by those who are part of my "From Petal to Pod Group" on Facebook - if you want to be part of the group, please drop me a note.
The head, tail and gill plates are peyote petals. The pectoral fins are pear-shaped peyote, based on a Monte Carlo Bracelet (a design by Gerlinde Lenz tutified by me at her demand), the pelvic fins and dorsal fin are made with herringbone with increases and last but not least, the tiny little anal fin was made with brick stitch. The bezels around the eyes were made with circular peyote.
I also used Diamond Weave in full hexagonal variation no. 3 with TCB - for the belly, which I embellished with a myriad of fire polished beads (which was something I had the feeling it was begging for repeatedly, lol).
Beading this purse was something awesome. I posted in-progress photos on FB and had a myriad of encouragements, which I appreciated very much. It helped keeping the motivation up. It took
11 days of intensive beading
2 days of forced rest, a bit of physio
Orange AB seed beads size 11/0 - 24g.
Red AB seed beads size 11/0 - 21g.
Topaz AB seed beads size 11/0 - 14g.
Dark gold permanent finish seed beads size 11/0 - 12g,
less than 1 g. coral lined size 15/0
less than 1g. 24Kt gold plated size 15/0
2 glass cabs
1 permanent marker, black
1 red coin purse
3 needles (size 11, 12 and 15)
1 bobbin of Hana thread "Gold Fish"
And voilà!
With the left over beads I am thinking of beading a lanyard - for the purse frame has some sort of loop for that, a chain tab. But I have to go back to work and write tutorials to add to my shop, for I need to feed my other (real) pets. Did you see that I listed the tutorial for the Pinwheel cuff, and another tutorial for a pretty, dainty bracelet, "Florets"? It is made with the same DW variation as used for the belly of the fish. So fast to make, it will knock your socks off.
I hope to do a tutorial for this, when my video skills and illustration software will have improved, for that are actually the reasons why this and some other designs are still not tutified - like the Samurai Pod and other 3D things. Working hard on it, and the video about fast peyote is part of the learning process.


 Using my "petal to pod" method, I first created the dolls little head - I seem to always start with a doll's head.
 Then I made her arms - also petals, but folded.


