Showing posts with label designing. Show all posts

Thursday, March 6, 2025

Beadworkers Guild 2025 Challenge - Mardi Gras!!!


Unused item #1.
Last year I didn't have much to write about my little yellow basket, my "challenge in a matchbox" submission, and also not much about our mammoth Group project... and it made me unhappy. To work so hard on something and not being able to talk about it (and also nobody else talking about it!!) is not what I want. I want to show and tell. So here you go. 

BTW, I participated in the Group challenge project too, but that will be another post. This post is about my individual entry in the "previous winners" category, and I am happy to be able to tell more about my WIP.

The theme - Mardi Gras - inspired me very much. I had a base for a Venetian mask in my "want to bead" drawer since forever and so I opted for a mask right away. 

Now you might not find it interesting to read on because there is nothing new about beading a mask... but you might like to see all the stuff I did not use in it? Because that actually is also part of the designing process, and in my mask, there were many renouncements...

First the white base, which was a very hard item, very uncomfortable on the face. I doubted that covering it with beads and fabric would help much. So I chose to sew a mask myself and back it with soft leather. 

For this, I thought that I would find a template online... but... nope. Fortunately, I remembered a video by the queen of beaded masks, Melissa Grakowski Shippee who showed how to sew a base for a mask with fabric. I couldn't find this video anymore (otherwise I would have included a link), but I hadn't forgotten everything and made my own template. I was very nervous when cutting the fabric, but things went well. Pfew! Also, I did my best to make the mask true to my own style.

I am happy to show you my "Bird of Paradise" 

Front view

side view left

side view right


My mask is a so-called Venetian "Colombina" style mask which, funnily, means "little dove" in Italian, also a bird. If you wish to know more about traditional Venetian mask designs, see this website.

My inspiration came in particular from something that really fascinates me: the large mandala-shaped rings the Venetians sometimes wear on their gloves. I love to see these elaborate jewels on silk, satin or leather gloves, something utterly gorgeous. In the collage below, you can see examples of this delightful "stravaganza".
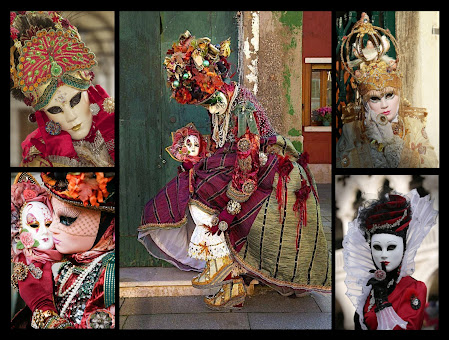
Look at the hands! Gorgeousness! Even mandalas on the sleeves of the lady with the doll in
full costume (included to show the attention to detail going into these costumes)

By the way, did you know that the costumes of the Venice carnival are theme-based? One year it was toys, another year time, etc...

Feeling adventurous, I ordered a mystery pack of crystals and elements from Edgar Lopez and raided my stash to find everything that could possibly go together well (imagine boxes of beads everywhere). I opted for a fuchsia and teal color combo, with pink, turquoise and other shades of the main colors, carefully mixed with gold beads, ball chain and cup chain to add a touch of whimsy and luxury. 

Focal top element - no glue involved. It's been a great exercise in "defying
gravity". Oh and can you see the "firework" in the cabochon?

For the top front element I selected a cabochon handmade by Edgar, to which I added lots of beaded petals made with my own method, the goal being to place feathers inside said petals, but also to have a focal piece that would look beautiful without feathers. The overall design had to be somewhat reminiscent of a Jolly hat, which could also be turned into a lovely necklace.

Unfinished focal, upside down

I bought various ribbons (unused #2), too thick cotton bands (unused #3), elastic bands (one of which I ended up using with much happiness), more beads (joker), and also more rivolis and crystal drops, which I didn't use either, lol! (#4 & #5). My foundation is made of one layer of Lacy stiff stuff and one of ultra suede and I used KO thread and KastKing thread.

I started with the eyes:

Materials: I rejected the shibori (#6) and emerald feathers (#7),
as well as beetle wings which I had (#8), all a bit too green.

Believe me when I say that kite- and leaf-shaped beads truly have their own will... And the ball chain bothered me from the first to the last day... but it was worth the effort. I decided right at the beginning to include it as to have a continuous 'loop' from eye-to-eye, drawing playful yet elegant lines.

I made mandalas to cover part of the mask and bead
embroidered more beads in between them (back stitch).

One major difficulty was the symmetry. In beading, I feel that I'm better off with asymmetric work, or freeform, for it is very hard to have perfect symmetry. Trust me that lots (loooots) of attention went into this. 

Then I encountered another, way bigger issue: I got tendonitis in my right arm and couldn't bead anymore. It was very frustrating, because it also was impossible to work on patterns (which still is really difficult), but it was a blessing in disguise somehow. It had me think of what to add to the bottom of this already quite heavy mask without adding too many beads, yet giving it that special "Venice" flair. Well, Manda Kent Burns' quattrefoil bead embroidery technique seemed to be the perfect answer.
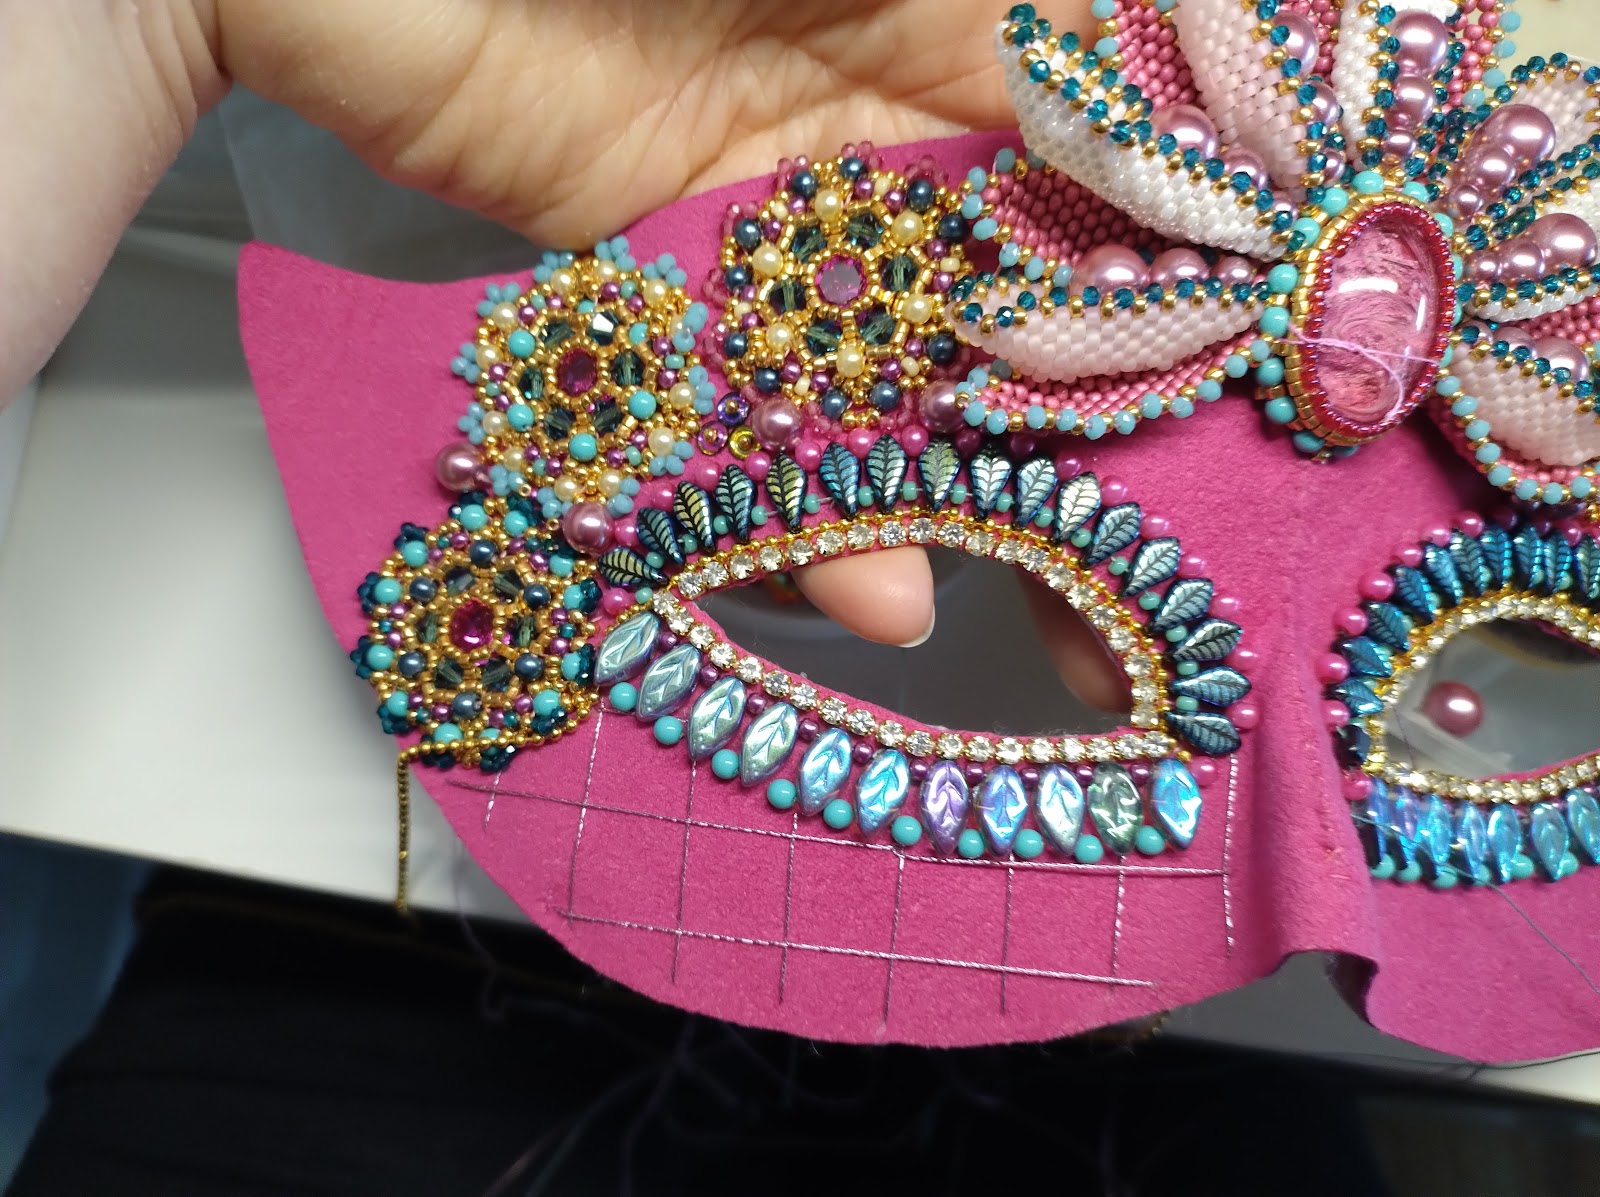
Addition of the grid: I used metallic thread called passing.
The very yummy kind of thread that has a thin laminated metal
strip wound around a cotton core, not the easiest to sow with.

For those who could not attend her GBBS master class at Daventry like me, Manda sells patterns and kits for lovely projects. I warmly recommend them. Her instructions for this embroidery technique (and her "Beadstump work") are very clear. She even sent me more images to help me understand everything well. I felt really empowered, armed with my ruler, when I started to draw the grid with metallic thread... 

You can see the quattrefoil stitches in this image, but also the
metallic thread at the back of the foundation. 

What I found to be rather challenging, was to have those 4 little beads sit as they should at each intersection of the grid. It requires high precision. I'm really happy that I tried it, and not just because it tics the BWG "challenge yourself" box.

The squares in the grid yearned for additions. Not each square though... I had small Preciosa hot fix crystals (# 9) that would have added amazing bling, but I wanted O beads with their confetti-look. Also, I could have been braver and stitch closer to the edge, but I knew that the addition of the leather for the backing could result in trimming the fabric a bit, and I feared cutting the metallic threads by mistake.

Decisions, decisions. In the image above you can see a box with little
Czech glass petal beads, which I also didn't use... (#10). 
And I trimmed the points on the side of the mask to make it rounder.

I still needed to do the backing and edging. Gawd, do I love leather backing and a beautiful edge. But with leather, one has to push hard on the needle, which I had to avoid  because of my arms. Fortunately, I have a great tool to have a better grip on the needle: I cut the fingers of a thin nitrile glove and wear that on my thumb and sometimes my index. Thanks to this, I slowly got it all done.

To cover 3 layers of quite thick fabric, it is best to use size 8°. But I didn't use my size 8° (#11). I chose beautiful gold Miyuki 3x1mm spacer beads and then added more beads (micro-crystals!!!), using Brickstitch for the top edge and Herringbone for the bottom edge.

Top edge. Super "flat" beads like the Miyuki spacers are a favorite material for this,
because the taller a bead, the more thread will be visible between the beads.

The head band is a lovely and super comfy elastic band with gold fibers in a pretty turquoise color. Edging the mask in that spot was a bit special: I added the chain and beads only at the front of the mask, to prevent my temples from being crushed 😧 by beads under the elastic.

Elastic band: the chain passes on top of it, no beads added at the back.
The chain was attached only once everything else was
in place, and then pretty dangles were added near the ears

O beads were added to the edge inside the eye holes.
The elastic band really bothered me here, because edging on
the inside of the mask required passing back and forth in the holes.

I colored the thread once the beads were in place, for it had to be
rose to match the leather, and turquoise to match the O beads.

 
More rejections! I thought that a bit of fluff would look amazing. I envisioned it from various angles, in particular the glittering gold yarn which looked like fireworks, but in the end, renounced to use them (#12) because they would have been too distracting.

Same for the 'stylized' feathers. I tried a bit of feather shaping to see what I could come up with to make my mask really special. I tried various ways to cut them, before I found out by accident that I could curl them and that looked just so perfect, that I didn't keep the cut ones (#13). Much fun has been had though 😊


I added more beads in bead embroidery, more petals for the 'beak', and wondered if there wasn't something missing to cover the cheeks, so I made a veil for the bottom portion of the mask. A little bit like the Venetian masks cover the entire face. To see how it would look, I had to make it, no choice. When I added it, it was lovely, but somehow didn't make the mask look better or more beautiful. In fact, it kind of "killed" it. I removed it (#14), and the mask came "back to life" (husbest's words) and so I could finish it. After all, this is made for Mardi Gras... one wants to eat on that day!


For those interested: the veil was made with Pondo stitch; the real method, not the Right Angle Weave method promoted by (way too) many a bead shop and YouTubers. Most irritating is that it's a bead shop in France who posted Pondo stitch instructions and then added 2 pages with something they considered "another or better" way to do Pondo. 😠I called them out, but they never corrected their stupid mistake and continue to call it Pondo, and many followed. But Pondo Stitch is NOT a RAW stitch. In Pondo, the beads are added to the previous rows by passing the needle UNDER the thread in between the beads and not by stitching through the beads. This is typical of African stitches: they avoid stitching more than necessary through the bead holes. Also the RAW variation already existed (as Faux RAW by Kassie Shaw). I could have done it with Super RAW (by Gwen Fisher) or Diamond Weave, but even if RAWs are supple, they wouldn't have the same drape as in the above veil. And believe me, not only was I really happy with that drape, it also saved me lots of time (for it is a very quick stitch) and thread, making it less a pity to remove. 😉

To study, I made this photo of the mask (without the feathers but with a half veil). Let me know what you prefer. With or without veil?? With or without feathers?? 

Veil or no veil? Feathers to fly or not to fly?
I decided to fly and as a consequence...

... had to reject my tiny bells

Searching for fun stuff to use, I stumbled upon tiny jingle bells (~6x8mm) on Ebay and bought a multi-color mix. Although fiercely vibrant in color, I thought that they could look nice at the tip of the petals in the top focal element, but the feathers won't allow their addition (#15)...

Of course my muse didn't stop pestering me with those lovely mandalas on handshoes, and considered that I had to make these too. I resisted as long as I was busy with the mask... and when finished, I didn't really want to let it go. You probably know the feeling: not wanting to stop beading because it brought so much joy? So... I gave in and ordered some satin gloves, which I adorned with 2 identical mandalas in different colors and added a little plus: ball chain as security chain 😌 to prevent these treasures from slipping off. You never know. 


And so here is the final result:

Bird of Paradise, mask and gloves

Voilà!!

I hope that you enjoyed this article about the inspiration behind and the making of my "Bird of Paradise" as much as I enjoyed making it.
 
I nearly forgot to say that it didn't win, which I expected.
My heartfelt congratulations to my friend Jess Hayman on her win!!!

 Cath


Sunday, June 2, 2024

Beadworkers Guild Challenge: Bead a Song.

When the new theme for this year's challenge was published, I knew instantly what to make, but I didn't feel like entering the "Previous Winners" category, because I needed time to bead together with other beaders of our Zoom beading group to enter the group challenge.

So I entered the Challenge in a Matchbox, to keep things small. It didn't win but I didn't even go for that, and there have to be losers anyway. That said, I am perfectly happy with it because I found the right technique for my "Little Yellow Basket" to a) look like real basketry, and b) to pop up. One can roll up the sides, so it is much taller than the matchbox, haha!


I used Peyote, Geometric Peyote, Herringbone, Netting, Brick stitch and Russian Spiral. The hinged handles and top are fully functional. There is a tiny little envelope, because the song mentions a love letter. I added tiny little flowers and bows to each  side. The perfect little basket to go picnicking in the garden... 

Which garden?

Well... maybe an English Country garden!

which is the song title we chose for our Group Challenge entry. Boy have I been busy with that! It takes a lot of time to write tuts, so imagine for a common project. We chose "English Country Garden" so that each member could make something. Some made a bird, some made leaves and greenery, some made flowers, some made an insect and some made several of all these, depending on their availability. 

A looooot of beading in total. This creation also exceeds the size of the box's maximum measurements: Sylvia, our fearless leader, thought of using magnets to allow an easier installation of the elements which travel flat.

There was no other group entry this year, which was quite a bummer, for winning by default is not really a win, but the whole group is chuffed to bits with the end result. 

Thing is, I have no photos to show but my garden gnome.


I forgot to make a photo of his friend the hedgehog, also in the scene... We will have to wait for the June Journal to show what was made. Torture. 

What I know about the other entries is that there was a lot of yellow and the pieces entered were all stunning.

So... apologies for this unusually short post about the challenge - I didn't want to let you wait until the end of June about this, and will post more as soon as I can. 

Until then... Happy Beading!


Cath

Tuesday, May 9, 2023

Beadworkers Guild 2023 challenge - Fur and Feather

This is a long post, so take a cup of your favorite brew and find a comfy seat to read a bit of my beady adventure. I could say it short, like... I made this. But that's not what this blog is for. This blog is about my iterations (experiments and discoveries, be they good or not so good) with beads, and the longer the make of a project, the longer the post, generally 😄. So... got your cup? Let's go.

At half past midnight on the 12th of March... after a shocking amount of trouble-shooting, beading and unbeading, decisions, additions, abandons, starting overs, pain everywhere, facepalm, "head in both hands", and a near-beady burn-out, I finished my BWG challenge submission with intense joy and relief. Here are

"Nanuq, Natsiq, Ukpiq and Ukaliq"

which are the names for "Bear, seal, snowy owl and Arctic hare" in Inuktikut, a language of natives of the great North.


I went through many emotions on this project, from despair to delight, and  from panic to relief. In February, I thought that I would never finish it on time - the deadline was 1st of April but for me, abroad, that meant posting the parcel with the beadwork mid-March. I heard a voice (yes, really) in my head, repeating every day "time is running out". The last month, every single moment I could, I worked on it. In the end I was exhausted, with everything hurting, neck, back, hands, fingers, joints, arms, etc, but if I hadn't done it, I would not have finished it on time, and I am so, so happy with what I made! I cannot even express how proud I am. 

It was really very difficult - from both a technical and emotional perspective -, but the result is even better than planned, because I added things that were not planned initially.

I am happy that I can finally show it and tell you more about it, because..

to remain silent about something I love so much is really hard, and if you remember well, there were several other things that I also could not talk about.


Fur and Feather - Theme interpretation

My first reaction was "I will not use fur!" Feathers sounded OK, because birds molt... Fortunately, it became very quickly clear that real fur wasn't asked for, but also... that the theme was about both feather and fur. So I could not make something just with or about feathers...

I have a crazy muse who has enough plans to keep me busy until beyond my earthly existence, so there are always several things on my wish-to-make list, and one of these things was a polar bear. I have a thing with polar bears. Very strong emotions. It must be my totem animal. That is one of the reasons why I actually delayed beading it. It didn't feel right so far. But of course the muse already started to poke me...

This box was part of my inspiration.

I kept an old tissue box since a long time, because I found the illustrations so cute. When hubby accidentally binned it, it had to come out of the recycling bin! A bear, a bunny and a robin are depicted. I had something Christmassy in mind with this: to place bear and bunny in a bauble! I didn't really care to make the tiny robin. Not that I couldn't: I made an itty bitty tiny crow years ago, companion to a little Maleficent doll...

The theme of the challenge had me think: apart from being soft and fluffy, hence not easy to use in needlework - and often unethically traded-, what do fur and feathers have in common? what are they for? Well, looking at the polar bear, the answer was simple: to keep their owners warm.

 
Nanuq is not snow white - he is the colour of the sun.
His skin is black and his long, coarse guard hairs,
which protect the plush thick undercoat,
are hollow and transparent and reflect the light.


Of course the bunny made me think of an Arctic hare, and because I had a large amount of white beads left over from my Princess Check pouch project (published in the January issue of the BWG journal), I thought of making a Polar Project.

Ukaliq is a master of camouflage - his fur turns
brown-grey in the summer


I already couldn't think of anything else, so I opted for a snowy owl and planned on using real feathers, which satisfied two of my other obsessions: 1) to see if my "Open Heart" beaded bead could become an owl's head as it was telling me ever since I designed it, and 2) to use the feathers collected during years from my little zebra finches.

Female 'Ukpiq' have many black spots, but males
become completely white.


So down the rabbit hole I went, again, for a crazy, puzzling, at moments terribly frustrating, exhausting-but in-the-end-fabulous beading adventure.


Young natsiq - it takes 6 to 8 years for a seal
to become an adult, going through several changes.
 

 Planning and studying

Before starting to bead, I hung out with each creature during a while. I watched photos and videos (for example this very poignant one (watch it later) to study their colour, posture and movements, because I wanted my critters to have a natural look. 

Believe me that this was the hardest study that I've ever done. My heart broke when reading about the melting of the Arctic, climate change, hungry polar bears, drowning seals. It was awful. I've always feared that the polar bear would be my Nemesis and it started to really bother me, but I remained strong, and the project became more and more meaningful. I imagined creating a protection around these beautiful and extraordinary animals.  


Finch feathers - tails and left and right wing feathers.


The making of this project

Time: It took a little over 4 months to bead. 

Materials: the same bead for nearly everything: opaque white! 

But I also used white pearl Ceylon, a mix of grey (for the seal), opaque black for details, transparent ab, and a few yellow opaque seed beads. Some in different sizes...
I also added Czech spike beads, Czech crystal bicones in matte crystal, a huge amount of Chinese crystal rondelles in navy, teal and sage for the water, transparent Austrian crystal bicones and white pearls in various sizes for ice and lace, topaz Chinese crystal rondelles and various gemstone chips for the tiny tundra, black glass pearls, black matte bugle beads, transparent glass thorn and flower beads, several odd beads to stuff heads and bodies, 1 big half round Toho seed bead... and even plastic transparent Hama beads - to create the floe and tundra foundations, eg. canvasses to embroider. 

It was all about snow, ice, water and warm white fur and feather coats so it was rather hard on the eyes.

Thread is a major design element in this project. The difference in colour between the 'white' animals and the snow comes from the thread. This was another obsession that I had since long: to see what the same white opaque seed beads look  like with a different colour thread. I aimed for a "warmer" white for the fur and I really love how it resulted in subtle differences. The bear was made with gold KO, the hare with natural (tan) KO, the snowy owl with ivory KO, the ice and snow with transparent nylon. White KastKing braided fishing line was used for the lacework to withstand the sharp holes of the crystal beads.

And of course I used acrylic baubles. Initially I had only 5 and 8cm baubles, then I chose 6, 10 and 14cm baubles. I sacrificed one bauble of each to make the lace and ribbons around them, because the beads scratched the acrylic glass while working and so the baubles became less transparent.

Designing decisions.

Thread was intentionally left apparent and dyed under the owl's eyes and on the seal's cheeks, for it's mustache. 
 
The owl's head can turn 360°, just like the real owl! 
 
 
The beak needed a little  brainstorming: I used a large demi-round by Toho and must say that it was a tour de force to have it sit right. I am really happy with how it turned out.
 
The big ice floe - which took forever to embroider with beads -and the tiny tundra foundation for the hare were made with plastic Hama beads, ironed hot to form a semi-rigid canvas to embroider with opaque white beads. This, together with the extra acrylic baubles, made the project become more pricy. I bought the large and a smaller plastic 'plaque' with pegs. The large plaque could only be used once - it became wobbly because of the heat of the iron, so that was not very cost-efficient... Under the tiny tundra, the mineral soil is represented by topaz crystals, jasper, pyrite and labradorite plus a few black seed beads mimicking plant roots. After all, Labrador is home to all the species shown in my project.


When portions in the "polar circle", as I called it, came off while beading, I decided to not repair it, but rather embrace the "melting" spots of my ice pack and enhanced them with Austrian crystals. Oh and for those who are interested in this: the mini Hama are near as small as, if not smaller than, the Delica beads in size 10. One has to be careful to not disturb the plaque with the beads otherwise they won't remain in place. In other words: don't sneeze!


To embroider the canvas obtained, it took an entire week, doing nothing else... It was hard on the hands because I had to push the needle through very narrow holes.

Hex cut transparent ab seed beads are spread
for a realistic aspect of glistening snow.

I hesitated a lot to add "water" - I added it only when I'd found the right shiny beads for that.


From above, the deep water looks dark blue. Under the ice floe, the matte crystal bicones, spike beads and green-blue crystals represent the teal-green universe of the seal - the colour of the water as seen from below the ice.

 
Technical aspects:
 
For the animals, I assembled shapes made with geometric Peyote stitch, like puzzles: petals, triangles, zigzag tubes, half-drops and even tall open warped hexagons (for the owl's legs) were used. Those who attended my Muserie workshop last year or bought the recently published pattern will know what this is about. 
 
Some 'wrong' makes...


For the Polar bear, I first made the arms, using a zig-zag method like for my old Skadi earrings. It was not easy to find the right count and thread path, but in the end, this allowed a smooth transition from body to arms to paws. 


For his shoulders and butt I used a small and a big petal. It was a mystery until the very end to see if that butt was the right size, which it miraculously was. 

The paws took more attempts than any other part of the animals. I studied them thoroughly, and to have the number of toes right, I had to start over and over. Of course I had to show this in photo because Nanuq is now attached to the ice floe. Did you know that the bear's 'heels' are nearly invisible, tucked inside his furr? Here too! I also love the look of the 'skin' under his armpits - just like a real bear. Proud designer here 😊


My first bear head looked more like a mouse head, but the 2nd was good. It took 4 wrongs for a good bunny head and for the owl it took 3 or 4 tries. For the seal, the first try was nearly the right one but it also took a second attempt. Same for the body.

Natsiq first try - it shows that I watched more
baby seals than juveniles :D

For the seal, I made petals in which I incorporated Helen McIntyre's nifty acute increase (as taught in the Guild's Journal issue 93).


It is hard to see, but I also made his tiny tiny tail (with darker beads) between his two finned feet. Seals are part of a family of marine mammals called pinnipeds, which means "who have feet like fins".


To give the hare enough detail without it becoming too big, I used 15° for the legs and ears. It has to be said that the smaller a critter, the harder it gets.


For the snowy owl to have an optimal, smooth increase in size, it took a bit of unbeading half way the making of its torso, but the legs worked out right immediately.
 
 
I am stunned myself at how the legs came together so well.


Without its feathers it looked very odd, but I kept the final image on my mental screen. I added the feathers at the very end, when all the beading was done - feathers are super fragile and this is also the reason why I kept the Christmas bauble idea: this way, it would be protected. The wings were included with a method which normally holds feathers well, but many of the finch feathers were so thin at their base, that they could fall off the beadwork. This is why I used a little bit of glue for security.


Of course there were lots of minor issues to address, but I also big ones. For example, to make the seal was a late decision, as an answer to a big issue: alone and off-centered, the bear had the floe tip over. With the seal as counterpoise under the floe, this doesn't happen anymore. Everything under under the flow, from seal to crystals, contributes to balance, but the floe became a little less flat. That said, despite a big glass bead inside the seal's body, the bear still is heavier than the seal. This is why I glued a portion of the floe to the inner wall of the bauble, something I really, really hoped to avoid... Fortunately the glue looks like water, so it is not as terrible as I feared it would be... Also, if it moved around in the bauble during transportation, the baubles would arrive completely scratched at destination. Reason why I also glued the tiny Tundra to its bauble (also with heavy heart).


Now, seals exist everywhere in the world, but harp seals clearly enjoy the very cold waters in the North. Only their very young babies are completely white. After a crucial lesson to learn to swim, these cuties are left alone on the ice where they were born, quite far away from the pole, to shed before starting to hunt for food themselves and head towards the North. This is the reason why this 4th critter is not white like the others.

 
Last but not the least, making the lace was... humbling. I had never tried anything like this before and actually thought that it would be quite a fun, quick & easy make. Hem hem... Nope... 😅
Just to give you a sense of size: the large bauble's contour is as long as a collar, that of the medium bauble is as long as an anklet and the lace around the small bauble could make a bracelet.
 
 
Lace for the large bauble - WIP.

 
To find the right curves and have everything sit right around those baubles was subject to a lot of unbeading. With each new addition I prayed "please don't pucker, please don't ruffle". But of course it ruffled, again and again, until the right bead count and size was found. Trial & error and patience is the only road for this type of work, and most often the ruffle appears only after the last bead is added in the circle. 
 
The lace is meant to bring the baubles together, to unify the universes of Air, Earth, and Water. I love how Hubble stitch and my Lyda chain create the look of hundreds of tiny little trees covered with snow, and so I used it for a snowy lace look at the bottom, and of course thin ribbons, to avoid covering too much of the glass.

Video of lace in the make:
 
These ribbons also would keep two halves of a bauble together in case it opens up (you never know).
 
To save my fingers from nickel in needles and tendons from suffering too much I used nitrile "glove fingers" (here to embroider the bottom of the floe, which was not an easy ride). My lack of grip on the needle is an EDS problem (you know, the Zebra kind of issues that I have)... but still, should you have tired tendons or fingers, this can help in case you are not able to have a good long rest!


I made videos of the baubles. I hope that it will give you a better view of the project.


I bought a stand to display the 3 baubles in the UK, and it was sent directly to the Guild. I hope that the photographer will succeed to catch the beauty of it all, because I found it very hard to photograph the baubles.

List of Stitches used:

Bead mosaic / melting Hama "Mini"
Bead Embroidery / lazy stitch and various other stitches for a layering effect
"Perfect edge" stitch as per Jamie E. Cloud
Coralling
Picot stitch
Circular Peyote
3D Peyote (body parts for the animals)
Cellini peyote (owl's head)
Netting (lace work, top of baubles)
Huichol (under the owl's chin)
Stitch in the ditch
Herringbone stitch, flat
    "    "    circular
Square stitch
Ladder stitch
St. Petersburg stitch
Brick stitch
Stringing
1-, 2- & 3-drop Hubble stitch in the round
Spaced-out Hubble stitch
Flipped Hubble stitch (lace work) (letting the units tip over).
Diamond Weave (icy point join
RAW (owl's tail, snowflakes, lace 'ribbons')
PRAW (lace 'ribbons')
Chenille stitch (top of baubles)

Plumasserie (feather work)

and perhaps I should add: a bit of DWYC...  Do-what-you-can-stitch. 😁

I tried to include MRAW (little snowflakes), but as explained, these would not have done the project justice, and a bit of Albion (abandoned paws), but I tried.

This project did not win in its category, but still is a winner: thanks to the many stitches used in the way they were used, it won the Founder's Award and it also won the Public Choice Award, which are chosen among all categories. That made my heart sing! Thank you very much to all who voted for it!


I'm sorry if this was a bit long, but it was quite a mammoth job...

So, thank you for reading this "mammoth" post.


And now I am procrastinating a bit.

 
I hope to be back soon :)

Cath