This blog uses cookies. By continuing to browse this blog you are agreeing to the use of cookies. OKLearn more. Other websites' cookies can also be placed on your device when you click on links, or share content on social media.
Welcome to my blog! I love beading and this blog is an attempt to share a few of my beady tries and things, thoughts and thrills and inform you about what's new (patterns, jewelry, etc..) I got hooked by the wonderful art of beading in 2004 and never stopped since then. I live in Switzerland, in a small town between Geneva and Lausanne.
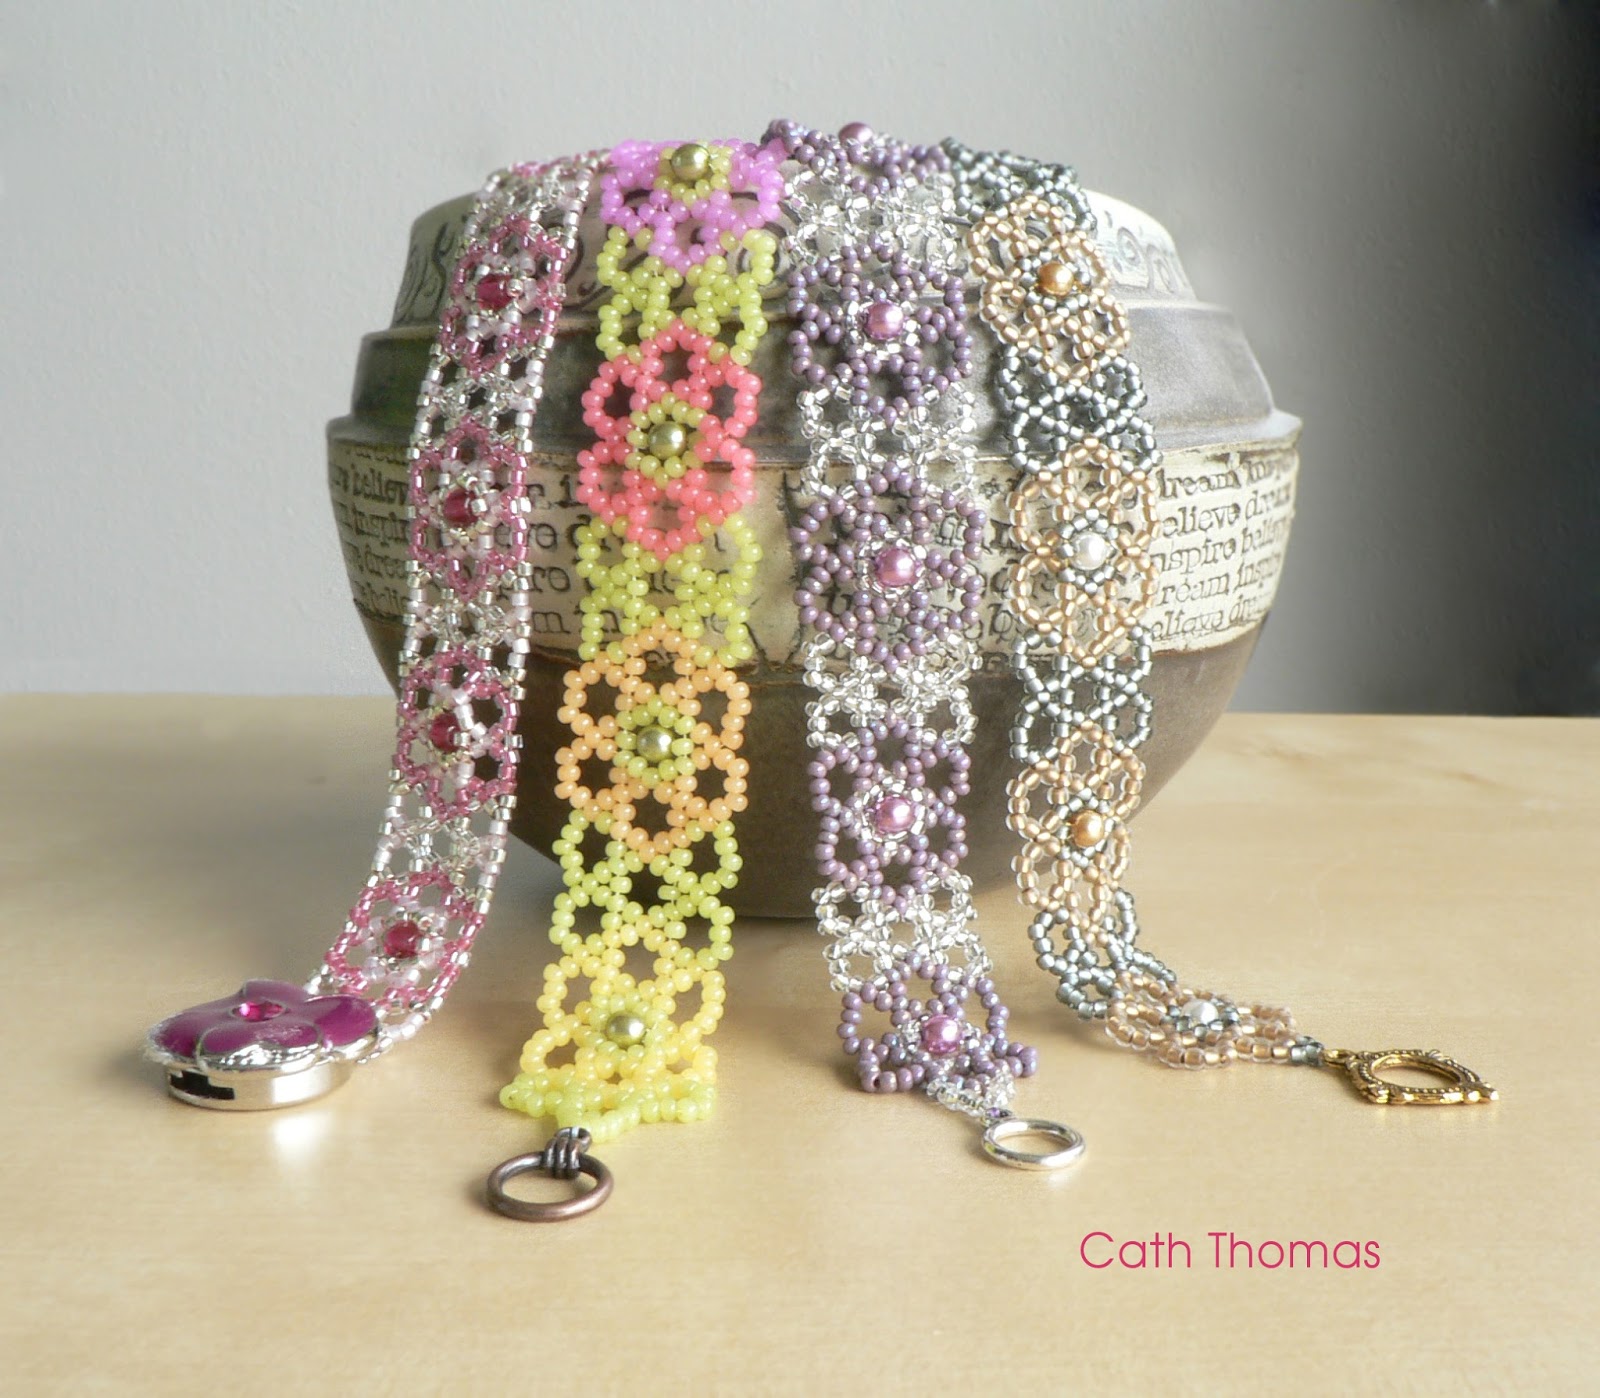
Two new designs have been addedd to the shop. The Pinwheel cuff / bangle and the Florets Bracelet. You will love them for different reasons: the Pinwheel cuff has a fabulous texture, and the Florets bracelet is a dainty little sweetness that builds up so fast that you'll make one for all women and girls in your tribe in very little time.
"Florets"
Pinwheel Cuff - in "Academy" green
I just received the latest Miyuki seed beads called "spacers", said to measure 2.2x1mm and 3x1mm, which is equivalent to a size 11/0 and a size 8/0, but thinner. They are very similar to the Toho "demi-round" seed beads, which measure 2.2x0.9mm and 3x1.15mm.
Miyuki Spacer beads 11/0 and 8/0
I love to use these little seed beads instead of a soldered ring to attach to an earring finding, or to sandwich beads or pearls to fill spaces with just the right amount of material without taking the lead. They add a little bit more texture and I love their look in my Cosmic Spiral lariat where they sandwich the red pearls.
I couldn't find information about the exact size of the spacers on Miyuki's website. Not many vendors mention their height (1mm). In the photo below, you will see that they are bigger than the Toho Demi rounds. If you count the number of beads, you will see that for 1cm you need less Miyuki (iris gold) than Toho. The Toho size is accurate and so is the size of the Miyuki spacer 11/0, 2.2x1mm. However, I think that the Miyuki spacer 8/0 measures 3x1.25mm and not 3x1mm.
From left to right: 9 Toho Demi round size 8/0, 8 Miyuki spacer size 8/0
11 Toho Demi round size 11/0, 10 Miyuki spacer size 11/0
As you can see in the photo above, showing a card with seed beads printed for size reference (a Preciosa Ornela reference card), sizes are measured by their diameter. The Toho and the Miyuki correspond to the size, although the Toho, here again, seem to be a liiiiittle bit smaller. The hole in the Miyuki spacers also seems to be slightly bigger.
Left Toho Demi Round 11/0, right Miyuki Spacer beads 11/0
There is a more distinct difference between the two brands, and that is their shape: whereas the Toho demi-rounds have indeed round walls, the Miyuki spacer wall is nearly flat, and visually, this makes a difference. I'd say that seen from the side, Toho's offer an even shine, and a quite thin, very discreet surface, whereas the Miyuki's show a thicker and flat surface, which shines only when seen from one direction - eg. when the beadwork moves.
Both the demi rounds and the spacers are truly delightful, precise, thin beads.
Left Miyuki Spacer beads 8/0, right Toho Demi round 8/0
Interestingly, the difference between the two brands in these thin beads is the contrary of the difference between their respective ordinary seed beads, where Miyuki seed beads 11/0 are smaller and slightly rounder than Toho seed beads 11/0.
Voilà, that's all.
.
.
.
.
Oh no that's not all. I also wanted to let you know that I have just listed a tutorial for this fantastic little skeleton - Elvis - in my shop. People who order a pattern for the same price as that one can get him for free until the 31st of October 2017. So if you buy a tutorial for the Pinwheel Cuff,you can get Elvis for free. Don't add him to your cart - just drop me a note that you want him too!
Except on paper (sketching), I had never beaded in my bedroom. But last Monday (October 9th 2017). I decided to go there for it is the only quiet place to film a video explaining how to do fast peyote with increases, using two threads. I talked about this method on Facebook, and one of my beady friends said that she was waiting for somebody to show it to her for she didn't get it right. So I thought that it would be nice to show it to all. It is a cool, fast method, and spares the tendons.
You'll see that I am far from being a pro at making videos. There are a couple of big sighs in it, because I have difficulties saying things right - I've always had, also in writing: I often say later what should come first, and vice versa. I also tend to mix up 'stitch-string-add' etc. Because of fibro, I forget to mention things I wanted to mention... and count the beads more times than shown in the video. This results in a lot of editing in both writing and filming. I hope that you will understand it despite the little cuts.
I am happy with the sound from an avian point of view. My first attempt to film this technique was ruined by a lovely, but deafening Figaro. I love my birds and Figaro and Charly are no exception, but they are noisy beasts. Seeing that I can't ask them to shut up, the bedroom appears to be the right place. It is actually really odd to not hear them at all when I am not talking. Next time I think that I'll leave the door open to at least hear them a little bit. I miss them :D
Figaro, Fluff' the Puff', and Miss White, sun bathing.
They are quiet at night, but then I still can't film because I'd need spots and those of you who know me, know that I can't use spots - also not for photography. The natural light in the bed room appears to be good enough - there is a huge window, letting lots of light enter the room without direct sun light.
Now there must be a fire polished bead somewhere in a corner of the room, because I am sure that I heard it fall. It makes a different sound than a seed bead, and seeing that I was adding those lovely faceted bead to the belly of my fish, there were FP on the BOI-board.
So now you may ask what fish?
May I present to you Takato, named after his 22cm real-life model, a big oranda living with us:
Takato and Takato
It is a purse that came together completely naturally. I had a little purse that I kept in my stash to reuse to make this fish. It had a very precise idea in mind since I wrote the book Diamond Weave (DW) but never got to make it. Then one day I saw Julia Turova's beautiful bead-knitted frog and it reminded me of my project.
I didn't want to bead crochet or knit. I wanted to use the beautiful pattern I imagined with the Diamond Weave Chinese Coin Motif stitch (variation 10 with Thread Cover Beads - TCB) for the back of the purse. It was a difficult project, but with plenty of "luck" - many things were made without having to undo or redo them, like the fish butt. I can't believe that I made it right immediately, because I actually was like "OMG how am I going to join it all and give that fish a nice shape? And there, a petal initially made for the gill plates that was too small got transformed into a "butt", which even appeared to be the perfect support for the tail. I call this beading with the Universe. Ask and you are answered. The next petals that I made for the gill plates were again too small, so I kept them for the tail. I really had many "how could I do this, improve that", and each time I asked myself, the answer came like magic. Everything fell in place better than I could have imagined. For those who wonder, petals are a two-increase form that is a very versatile component, The free tutorial can be downloaded by those who are part of my "From Petal to Pod Group" on Facebook - if you want to be part of the group, please drop me a note.
The head, tail and gill plates are peyote petals. The pectoral fins are pear-shaped peyote, based on a Monte Carlo Bracelet (a design by Gerlinde Lenz tutified by me at her demand), the pelvic fins and dorsal fin are made with herringbone with increases and last but not least, the tiny little anal fin was made with brick stitch. The bezels around the eyes were made with circular peyote.
I also used Diamond Weave in full hexagonal variation no. 3 with TCB - for the belly, which I embellished with a myriad of fire polished beads (which was something I had the feeling it was begging for repeatedly, lol).
Beading this purse was something awesome. I posted in-progress photos on FB and had a myriad of encouragements, which I appreciated very much. It helped keeping the motivation up. It took
11 days of intensive beading
2 days of forced rest, a bit of physio
Orange AB seed beads size 11/0 - 24g.
Red AB seed beads size 11/0 - 21g.
Topaz AB seed beads size 11/0 - 14g.
Dark gold permanent finish seed beads size 11/0 - 12g,
less than 1 g. coral lined size 15/0
less than 1g. 24Kt gold plated size 15/0
2 glass cabs
1 permanent marker, black
1 red coin purse
3 needles (size 11, 12 and 15)
1 bobbin of Hana thread "Gold Fish"
And voilà!
With the left over beads I am thinking of beading a lanyard - for the purse frame has some sort of loop for that, a chain tab. But I have to go back to work and write tutorials to add to my shop, for I need to feed my other (real) pets. Did you see that I listed the tutorial for the Pinwheel cuff, and another tutorial for a pretty, dainty bracelet, "Florets"? It is made with the same DW variation as used for the belly of the fish. So fast to make, it will knock your socks off.
I hope to do a tutorial for this, when my video skills and illustration software will have improved, for that are actually the reasons why this and some other designs are still not tutified - like the Samurai Pod and other 3D things. Working hard on it, and the video about fast peyote is part of the learning process.