 |
| Unused item #1. |
BTW, I participated in the Group challenge project too, but that will be another post. This post is about my individual entry in the "previous winners" category, and I am happy to be able to tell more about my WIP.
The theme - Mardi Gras - inspired me very much. I had a base for a Venetian mask in my "want to bead" drawer since forever and so I opted for a mask right away.
Now you might not find it interesting to read on because there is nothing new about beading a mask... but you might like to see all the stuff I did not use in it? Because that actually is also part of the designing process, and in my mask, there were many renouncements...
First the white base, which was a very hard item, very uncomfortable on the face. I doubted that covering it with beads and fabric would help much. So I chose to sew a mask myself and back it with soft leather.
For this, I thought that I would find a template online... but... nope. Fortunately, I remembered a video by the queen of beaded masks, Melissa Grakowski Shippee who showed how to sew a base for a mask with fabric. I couldn't find this video anymore (otherwise I would have included a link), but I hadn't forgotten everything and made my own template. I was very nervous when cutting the fabric, but things went well. Pfew! Also, I did my best to make the mask true to my own style.
I am happy to show you my "Bird of Paradise"
 |
| Front view |
 |
| side view left |
 |
| side view right |
My mask is a so-called Venetian "Colombina" style mask which, funnily, means "little dove" in Italian, also a bird. If you wish to know more about traditional Venetian mask designs, see this website.
My inspiration came in particular
from something that really
fascinates me: the large mandala-shaped rings the Venetians sometimes wear on their gloves. I love to see these
elaborate jewels on silk, satin or leather gloves, something
utterly
gorgeous. In the collage below, you can see examples of this delightful
"stravaganza".
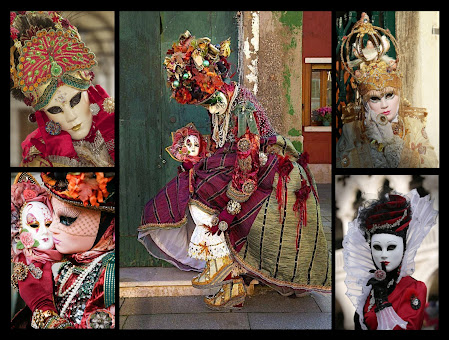 |
| Look at the hands! Gorgeousness! Even mandalas on the sleeves of the lady with the doll in full costume (included to show the attention to detail going into these costumes) |
By the way, did
you know that the costumes of the Venice carnival are theme-based?
One year it was toys, another year time, etc...
Feeling adventurous, I ordered a mystery pack of crystals and elements from Edgar Lopez and raided my stash to find everything that could possibly go together well (imagine boxes of beads everywhere). I opted for a fuchsia and teal color combo, with pink, turquoise and other shades of the main colors, carefully mixed with gold beads, ball chain and cup chain to add a touch of whimsy and luxury.
 |
| Focal top element - no glue involved. It's been a great exercise in "defying gravity". Oh and can you see the "firework" in the cabochon? |
For the top front element I selected a cabochon handmade by Edgar, to which I added lots of beaded petals made with my own method, the goal being to place feathers inside said petals, but also to have a focal piece that would look beautiful without feathers. The overall design had to be somewhat reminiscent of a Jolly hat, which could also be turned into a lovely necklace.
 |
| Unfinished focal, upside down |
I bought various ribbons (unused #2), too thick cotton bands (unused #3), elastic bands (one of which I ended up using with much happiness), more beads (joker), and also more rivolis and crystal drops, which I didn't use either, lol! (#4 & #5). My foundation is made of one layer of Lacy stiff stuff and one of ultra suede and I used KO thread and KastKing thread.
I started with the eyes:
 |
| Materials: I rejected the shibori (#6) and emerald feathers (#7), as well as beetle wings which I had (#8), all a bit too green. |
Believe me when I say that kite- and leaf-shaped beads truly have their own will... And the ball chain bothered me from the first to the last day... but it was worth the effort. I decided right at the beginning to include it as to have a continuous 'loop' from eye-to-eye, drawing playful yet elegant lines.
 |
| I
made mandalas to cover part of the mask and bead embroidered more beads in between them (back stitch). |
One major difficulty was the symmetry. In beading, I feel that I'm better off with asymmetric work, or freeform, for it is very hard to have perfect symmetry. Trust me that lots (loooots) of attention went into this.
Then I encountered another, way bigger issue: I got
tendonitis in my right arm and couldn't bead anymore. It was very
frustrating, because it also was impossible to work on patterns (which
still is really difficult), but it was a blessing in disguise somehow.
It had me think of what to add to the bottom of this already quite heavy
mask without adding too many beads, yet giving it that special
"Venice" flair. Well, Manda Kent Burns'
quattrefoil bead embroidery technique seemed to be the perfect answer.
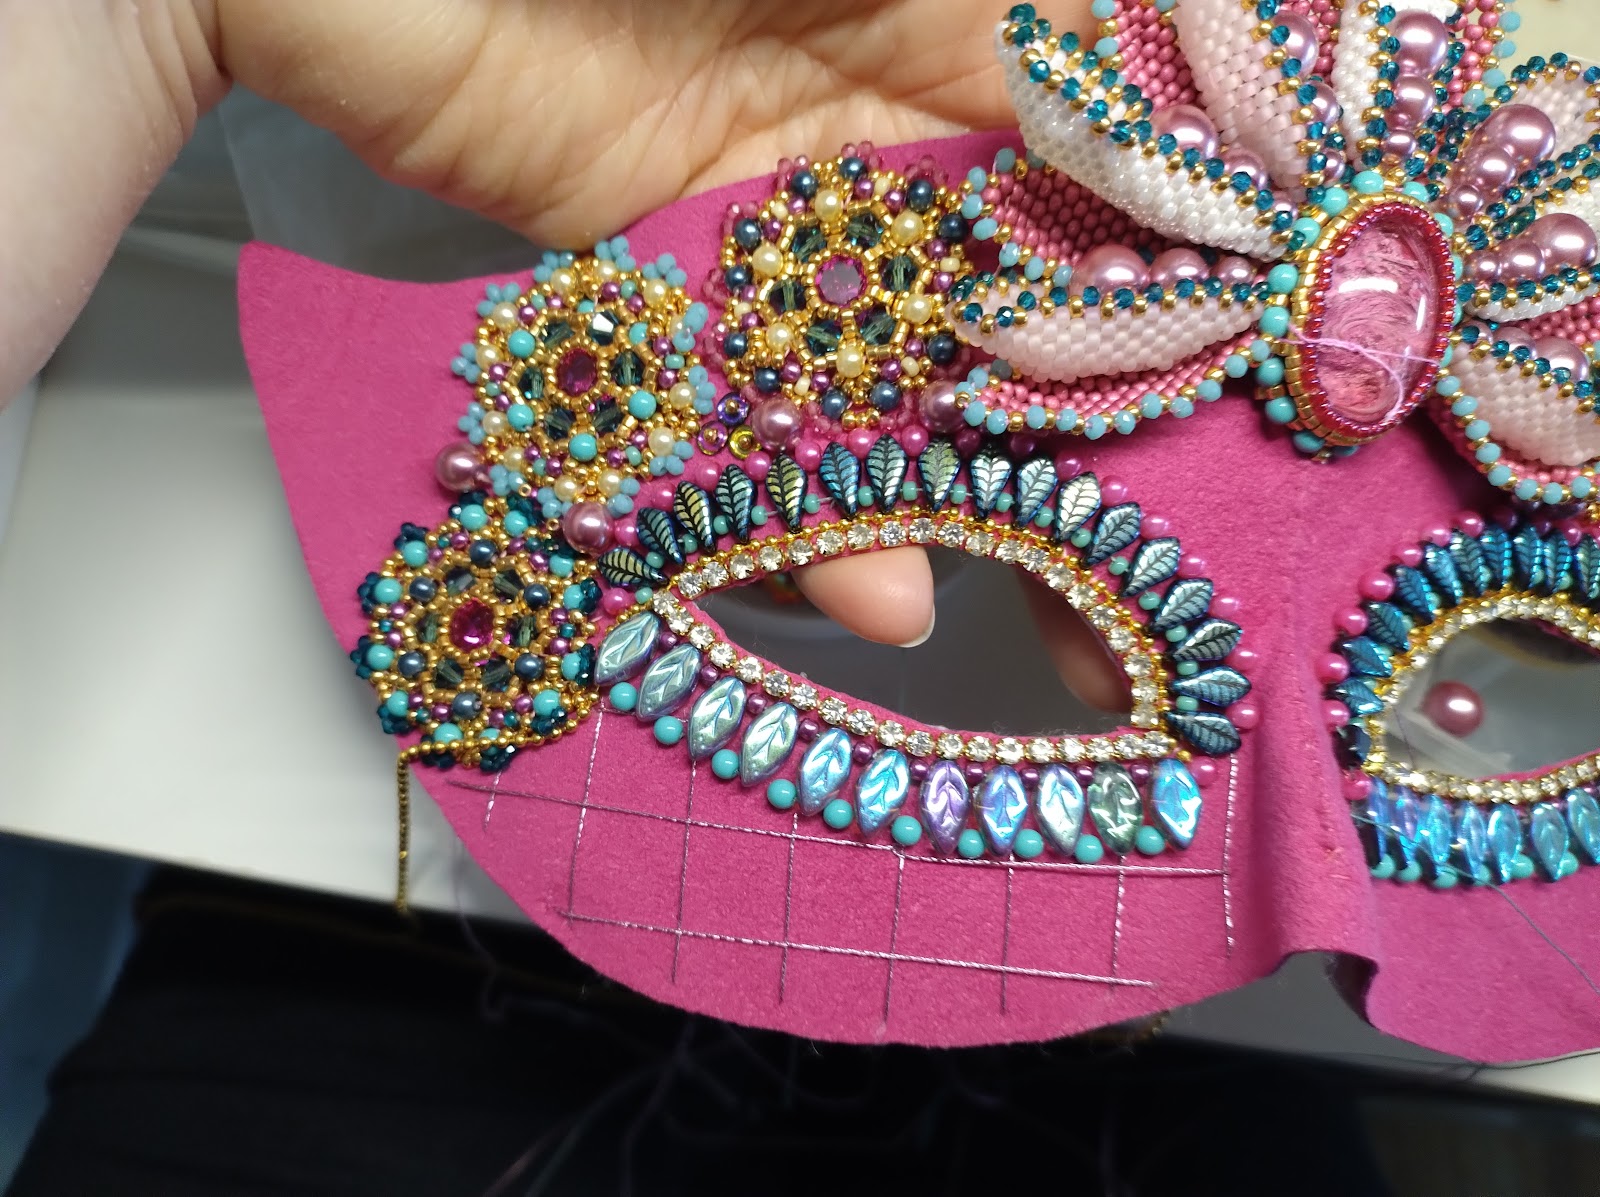 |
| Addition of the grid: I used metallic thread called passing. The very yummy kind of thread that has a thin laminated metal strip wound around a cotton core, not the easiest to sow with. |
For those who could not attend her GBBS master class at Daventry like me, Manda sells patterns and kits for lovely projects. I warmly recommend them. Her instructions for this embroidery technique (and her "Beadstump work") are very clear. She even sent me more images to help me understand everything well. I felt really empowered, armed with my ruler, when I started to draw the grid with metallic thread...
 |
| You can see the quattrefoil stitches in this image, but also the metallic thread at the back of the foundation. |
What I found to be rather challenging, was to have those 4 little beads sit as they should at each intersection of the grid. It requires high precision. I'm really happy that I tried it, and not just because it tics the BWG "challenge yourself" box.
The squares in the grid yearned for additions. Not each square though... I had small Preciosa hot fix crystals (# 9) that would have added amazing bling, but I wanted O beads with their confetti-look. Also, I could have been braver and stitch closer to the edge, but I knew that the addition of the leather for the backing could result in trimming the fabric a bit, and I feared cutting the metallic threads by mistake.
 |
| Decisions, decisions. In the image above you can see a box with little Czech glass petal beads, which I also didn't use... (#10). And I trimmed the points on the side of the mask to make it rounder. |
I still needed to do the backing and edging. Gawd, do I love leather backing and a beautiful edge. But with leather, one has to push hard on the needle, which I had to avoid because of my arms. Fortunately, I have a great tool to have a better grip on the needle: I cut the fingers of a thin nitrile glove and wear that on my thumb and sometimes my index. Thanks to this, I slowly got it all done.
To cover 3
layers of quite thick fabric, it is best to use size 8°. But I didn't use
my size 8° (#11). I chose beautiful gold Miyuki 3x1mm spacer beads and then added more beads (micro-crystals!!!), using
Brickstitch for the top edge and Herringbone for the bottom edge.
| ||

The
head band is a lovely and super comfy elastic band with gold fibers in a
pretty turquoise color. Edging the mask in that spot was a bit special:
I added the chain and beads only at the front of the mask, to prevent my temples from being crushed 😧 by beads
under the elastic.
 |
| Elastic band: the chain passes on top of it, no beads added at the back. The chain was attached only once everything else was in place, and then pretty dangles were added near the ears |
 |
| O beads were added to the edge inside the eye holes. The elastic band really bothered me here, because edging on the inside of the mask required passing back and forth in the holes. |
 |
I colored the thread once the beads were in place, for it had to be |

 More
rejections! I thought that a bit of fluff would look amazing. I envisioned it from various angles, in particular the glittering gold yarn which
looked like fireworks, but in the end, renounced to use them
(#12) because they would have been too distracting.
More
rejections! I thought that a bit of fluff would look amazing. I envisioned it from various angles, in particular the glittering gold yarn which
looked like fireworks, but in the end, renounced to use them
(#12) because they would have been too distracting. 

Same for the 'stylized' feathers. I tried a bit of feather shaping to see what I could come up with to make my mask really special. I tried various ways to cut them, before I found out by accident that I could curl them and that looked just so perfect, that I didn't keep the cut ones (#13). Much fun has been had though 😊
I added more beads in bead embroidery, more petals for the 'beak', and wondered if there wasn't something missing to cover the cheeks, so I made a veil for the bottom portion of the mask. A little bit like the Venetian masks cover the entire face. To see how it would look, I had to make it, no choice. When I added it, it was lovely, but somehow didn't make the mask look better or more beautiful. In fact, it kind of "killed" it. I removed it (#14), and the mask came "back to life" (husbest's words) and so I could finish it. After all, this is made for Mardi Gras... one wants to eat on that day!

 |
For those interested: the veil was made with Pondo stitch; the real method, not the Right Angle Weave method promoted by (way too) many a bead shop and YouTubers. Most irritating is that it's a bead shop in France who posted Pondo stitch instructions and then added 2 pages with something they considered "another or better" way to do Pondo. 😠I called them out, but they never corrected their stupid mistake and continue to call it Pondo, and many followed. But Pondo Stitch is NOT a RAW stitch. In Pondo, the beads are added to the previous rows by passing the needle UNDER the thread in between the beads and not by stitching through the beads. This is typical of African stitches: they avoid stitching more than necessary through the bead holes. Also the RAW variation already existed (as Faux RAW by Kassie Shaw). I could have done it with Super RAW (by Gwen Fisher) or Diamond Weave, but even if RAWs are supple, they wouldn't have the same drape as in the above veil. And believe me, not only was I really happy with that drape, it also saved me lots of time (for it is a very quick stitch) and thread, making it less a pity to remove. 😉
To study, I made this photo of the mask (without the feathers but
with a half veil). Let me know what you prefer. With or without veil??
With or without feathers??
 |
| Veil or no veil? Feathers to fly or not to fly? I decided to fly and as a consequence... |
 |
| ... had to reject my tiny bells |
Of course my muse didn't stop pestering me with those lovely mandalas on handshoes, and considered that I had to make these too. I resisted as long as I was busy with the mask... and when finished, I didn't really want to let it go. You probably know the feeling: not wanting to stop beading because it brought so much joy? So... I gave in and ordered some satin gloves, which I adorned with 2 identical mandalas in different colors and added a little plus: ball chain as security chain 😌 to prevent these treasures from slipping off. You never know.


And so here is the final result:
Bird of Paradise, mask and gloves

I hope that you enjoyed this article about the inspiration behind and the making of my "Bird of Paradise" as much as I enjoyed making it.
My heartfelt congratulations to my friend Jess Hayman on her win!!!
Cath