Thankfully, it is the Fall again. I could live in the Fall the entire year - not too cold, not too warm, a mix of beautiful weather and lovely rain, warm during the day, fresh during the night, an occasional foggy morning, splendid colors in nature and marvelous light... and good food - it's a season of abundance. |
 |
| Panoramic view - perhaps open it in a new window, to increase it and better appreciate it. |
The photo above is a view of my place end September 2025. Hubby and I went for a walk, and there is a bench allowing people to enjoy this gorgeous view of the mountains and the lake (you can see our shadow left in the image). Soon the green leaves will all be yellow or red, with more beautiful walks to look forward to.
and more delicious food 😋
 |
| First stew of the season - I made a mustard sauce after removing the veggies. |
It's been a while since I wrote something here. The intense socializing during IBW is so overwhelming (in a good way), that some sort of social "estivation" seems to happen (for those who wonder, that's similar to hibernating, but in the Summer :) The increasing warmth in the summer here is a real antidote to hyperactivity too. Walks and bike tours are reduced to the minimum (nearly none at all...) and doctor and physio appointments are avoided as much as possible. This year was particularly frustrating, because passed the heatwave, the weather was just fabulous and I was very envious of whomever could go to the lake and swim and sunbathe... sigh.
 |
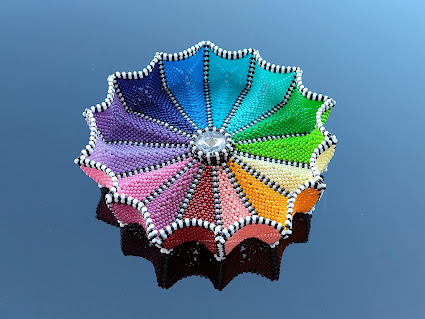
| Mel made a fun screenshot of me doing my IBW talk. It's been an absolute delight to see so many Ubuntu Dishes pop up in my newsfeed after that! |
I didn't see the time go by though. It's incredible to see that we are October already. Thinking about it, I realized that each year the first half is fully booked, with one or two projects for the Beadworkers Guild Challenge; a lot to prepare for International Beading Week, and more commitments like workshops, writing instructions for projects for the Guild's Journal and, this year, 6 projects for the online magazine Creative Crafters. This explains why I design nearly nothing new.
I had a lot of fun beading Nancy Kooijers Jenner's lovely gumdrop bird and gave it the colors of my little bird Charly, a Zebra finch. It went to my giftee in the IBW gift exchange, so I made a second, slightly different one. I had a good spot for this cutie: the oak tree that I made during a Beading Festival Zoom get together.

In fact, I didn't really have an "estivation" and was rather busy: I started beading my next BWG challenge project (which I might not finish in time, but will try), and wrote instructions for the "Rings" Meet Mingle and Make Zoom meeting. I will publish this pattern real soon in my shop. This "Colimabangle" was made a long time ago, but I didn't pattern it back then. It is a bangle/bracelet made with Tubular Diamond Weave Variation #8.


My husband and I also worked hard to give our apartment a bit of a makeover, and did a lot of things like painting, carpeting, changes in furniture, etc. We still aren't completely done, but I'm a rather happy camper.
My beading "studio" is still the size of a 'handkerchief', and it will be upgraded some day, but it works well enough for my workshops. I now have a comfy recliner for beading in the living room - but light has to be improved. It's a relief to have that big Kallax cabinet for all my beads. Things were starting to take over the living room. Now it's nearly all in one place, but at least everything has a place. I kept all my boxes and trays and vials and tubes, etc... it's all in there, and many more other things. Happy dance!
 |
| My little studio |
This all being said, I thought that I should show you my designs published in the Creative Crafters magazine this year. It's an e-publication created for beaders by beader and editor Cheryl Bryan. She is the talented designer behind "Hookin' to the beat" designs. You can still get access to these magazines if you go to Cheryl's shop, where the magazine is sold in separate issues. The price is lower than a single pattern! A real bargain, for there are loads of lovely designs in it.
My contributions were all Diamond Weave designs, offering a condensed experience of what you can learn from the Diamond Weave Book, plus an extra: tubular Diamond Weave.
In January the project was a pair of very simple earrings made with the Basic stitch, to explain the ABC of Diamond Weave.
 |
| January - basic DW earrings |
 |
| March - Giverny bracelet |
In March, I introduced the Giverny bracelet, made with variation #3 of the stitch (with buttonholes), in the colors of the beautiful waterlily pond of Monet's garden. It is a full hexagon stitch that shows the beader how extension beads and bridge beads (both horizontal) transform the square units - the structural beads - into hexagonal units. This project was included in the Diamond Weave book. The next projects, in particular the one in September, are built on the knowledge acquired with this variation.
 |
| May: Diamond Weave variation #7 |
In May, I explained how the incredibly versatile variation #7 - a nice octagonal stitch to use with seed beads as well as other beads - can result in plenty of different looks depending on the beads used. Detailed explanations were given along with examples.
 |
| July: Inkpots - Var. 9 |
 |
| Bonus: Gate to Paradise |
In July, the project "Inkpots" made with variation #9, introduced the beaders to the particular role of thread cover beads, namely how they stabilize the beadwork, and how seed beads can shine in Diamond Weave. I added the "Gate to Paradise" as a bonus pattern, a design that somewhat introduced the next project, that is the use of thread cover beads and how to draw patterns with the beads in DW variations with seed beads.
For the September issue, I patterned one of my favorite designs, the Celestial cuff, to which I added planet Uranus (the original one included a sun, the moon and stars). I really like to draw simple motifs with stitches like this.
 |
| Celestial Cuff |


For the upcoming November issue, the last of this series, these cute "Linda" earrings will explain how to do tubular Diamond Weave:
 |
| November: Linda earrings, here in fruit colors |
 |
| Linda earrings in blue & gold |
It all starts with this super small cube:

All together, these projects encompass a major part of the knowledge you'll learn from the Diamond Weave book, but not everything. In the book, there is more, much more, but the tubular project is 'new'. I mean, I made the Linda earrings quite some time ago but didn't tutify them. Back then, I called them "beautiful", which is the meaning of the name Linda, Linda sounds much nicer, and I have a very lovely friend on FB called Linda, hence the name change.
This reminded me of a medley of tubular Diamond Weave stitches that I made into a simple lariat rope some time ago - each segment is a different variation, to remind me how they look:


I wonder if there are folks out there who are interested in Diamond Weave ropes. I hope so, because it's a fun stitch, and not as difficult as one would think.
I miraculously found time to make a special pendant for myself with a cabochon that I purchased a long time ago from Designers Cabochons (a UK-based lapidary wizard). It has a hole in its center which allowed me to attach beads, and I love the look. The back is leather, the bail is a Petal (from my Petal to Pod method) and the necklace is made of 4 pearl strands. I love to use pearl strands to add pendants. I hope that you like my "Mended Heart":

If you are still here reading this, thank you! I initially didn't think that I had so many things to tell! Lol!
Thank you for for taking a bit of your time, for being a friend, and for your continuous support.
Happy Beading,
Cath